|
Viewing
Copyright
Map list
Photo list
Index maps
Map-reading
More...
The Project
FAQs
Front page
|
How to find a point on an early trench map
The early Great War maps used the system of squaring below.
This is found on some 1914 and early 1915 maps, notably the
1:40,000 series.
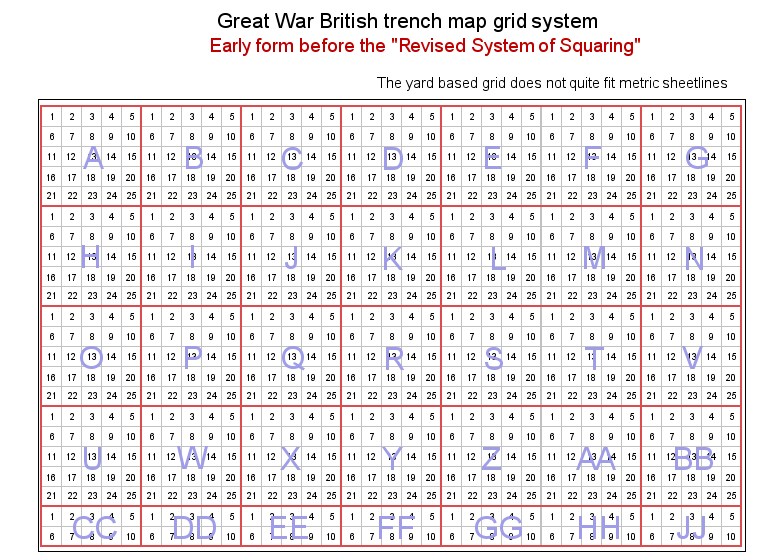
The map is divided into large squares, lettered "A",
"B", "C", "D", etc., the sides
of which are 5,000 yards in length.
The large squares are divided into 25 smaller squares, numbered
1 to 25, the sides of which are 1,000 in length.
The areas 6, 7, 8, 9, 10, in squares CC, DD, EE, FF, GG,
HH, JJ, are rectangles of 1,000 yards by 830 yards.
The minor squares and rectangles are to be considered as
lettered "a", "b", "c", "d,"
but the letters are only printed in one small square to avoid
confusing the map.
A point can thus be described as lying in square A.2.c, D.5.a,
etc.
If the position of a point can be identified more closely,
the further description N, S, E, or W may be added.
If only the description of the small squares is given, e.g.,
A.2, the position indicated will be taken to be the centre
of A.2. Similarly, A.2.d. will be taken as meaning the centre
of the minor square A.2.d. unless a further description N.,
S., etc., is added.
The description A.2.c.d. can be used if uncertainty exists
as the whether "c" or "d" is the correct
minor square.
Most maps of the Great War did not use this system. When
it was superceded, for a while maps were marked "Revised
System of Squaring". To find a point on these maps, see
the main article on How to find a point
on a trench map.
|
|